Return mechanism for an engine Start Switch
In some airplanes, like B737, when you start an engine the switch is held in the start position until turbine RPM is raised to the sustained level. To create a return mechanism for an engine start switch like this, use the SimVimX function "Starter_Return". This parameter can be assigned as a servo output or as a simple digital output for an electromagnet.
On engine start, the plugin monitors several parameters, such as the starter switch position ("Start_Mode_#"), the pressure in the Bleed Air duct, current engine and ignition system state, and N2 % that is compared with the predefined data value (default 55%). This may be tuned for specific airplane models in the future.
If all conditions are met, the switch is held in the start position until N2% raises above the predefined value, then it sets "Starter_Return" to "1".
Then, "Starter_Return" is set to "0" after about 2 seconds, so that a servo motor has time to make a full move from "off" to "push switch back" position.
So, this parameter can be used both for a servo motor and for an electromagnet, and it should work correctly for any aircraft, you do not need to worry about finding special custom datarefs for it.
Starter Return (pull) mechanism
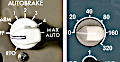
When you turn the switch into the start position, it is held in this position mechanically if all needed conditions are met until the engine speed is raised to the predefined flight model start value and the actuator returns the switch back to OFF(AUTO) position.
1. Assign the "Starter_Return" parameter as a servo output, then calibrate the servo in the plugin menu, as described here.
2. In the "Calibration Tool" window: select the assigned servo, move the servo to the "switch free" position and enter value = 0, then move it to the "push the switch back" position and enter value = 1.

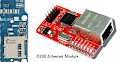
If you prefer to use a solenoid/electromagnet as actuator, you need to assign the "Starter_Return" parameter as a simple digital output to control the related power driver or relay. This option can be simpler to you, just use appropriate relay or transistor (or driver board) to power the solenoid.

Starter Hold/Release mechanism
You can use a hold-up solenoid (electromagnet) to hold the starter switch in the Start/GND position. It is not powered in free state when the starter switch is any position other than GRD (which is spring-loaded to return the switch knob to OFF position.).
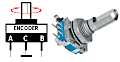
To power the electromagnet you should use the second contact group of the rotary switch. Usually, most of the rotary switches have more than one "parallel" contact group. The first group should be used as inputs for the controller/multiplexers, and the first contact from the secondary group used as power line for your solenoid.
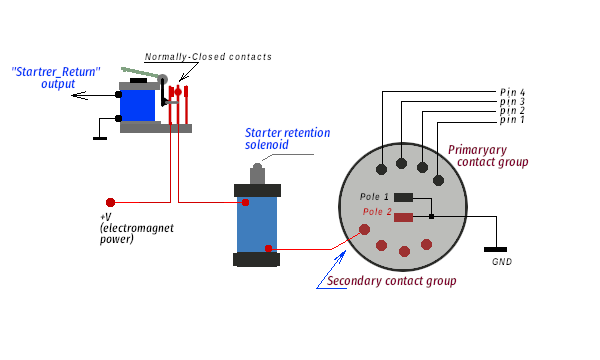
When you turn the switch to the Start (GRD) position, the first contact from the "primary" group shorts the "Start" digital input to the GND and the first contact from the secondary group completes the power circuit for the electromagnet which is activated and holds the switch in this position.
Note - If you have a rotary switch with only one group of contacts (one pole / several throws), you can use an additional (external) switch that closes the solenoid power circuit in the “start” position of the switch.
Release the magnet
When the turbine speed is raising to start-safe, the signal on the digital output assigned as "Starter_Return" raises to logical "1", and you can use this signal to release the magnet power using either electro-mechanical or electronic switch that opens the circuit. In the first case use some low-current relay, in the second case you need to use a FET transistor.
Note - use the NC (normally-closed) contacts on the relay. When the relay is activated by the "return" signal these contact are opening for a moment and disconnect the power from the hold-ip solenoid..